Docker Compose Scenarios
Overview
If the "vanilla" Zammad stack doesn't cover your use-case, you can use one of the pre-defined scenarios. We don't recommend to change the Compose files locally, because it will be hard to keep track of upstream changes for the stack then. This is why you should either use Portainer's repository build method or clone the repository and update it regularly, when using Docker Compose.
The following scenarios are supported and explained further below:
- Making the stack available via HTTPS
- Add a Cloudflare tunnel service to the stack
- Add a Nginx Proxy Manager (NPM) to the stack
- Add an external Docker network to Nginx
- Using external services
- Disable Elasticsearch service
- Making services externally available
- Add an external Docker network to Elasticsearch
- Add an host port to Elasticsearch
- Additional scenarios
- Disable the backup service
- Add an Ollama instance to the stack
- Limit hardware resources of the stack
You can find the files in the Zammad-Docker-Compose repository.
General Usage
Follow the general deployment guide and apply the following changes.
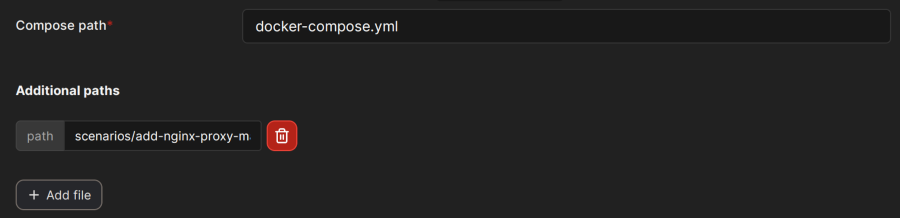
Below the "Compose path" field, click on the Add file button. This opens the "Additional paths" section where you can specify the scenario you want to use. Add scenarios/{scenario you want to use}.yml and replace the last part in {} brackets with the name of one of the scenario files. You can even combine the scenarios by adding additional paths.
Making the Stack Available via HTTPS
If you set up Zammad for production use, it needs to be secured by using an HTTPS connection. There are different scenarios for achieving this:
Add Cloudflare Tunnel
If you want to publish Zammad in a very convenient way, you can use a Cloudflare tunnel.
- Use the scenario file
scenarios/add-cloudflare-tunnel.ymlfor deployment - Add a sub-domain to an already existing domain in your Cloudflare dashboard
- Create a tunnel for this subdomain and configure it to forward traffic to your zammad-nginx service with
http://zammad-nginx:8080 - Provide your Cloudflare tunnel token to the Zammad stack by using the environment variable
CLOUDFLARE_TUNNEL_TOKEN
Add Nginx Proxy Manager
A very common setup of publishing web services is to use a reverse proxy, which handles the SSL termination. One common tool is the Nginx Proxy Manager (NPM), which can be configured via UI quite simply. If you don't have a reverse proxy already, this might be a useful scenario for you. If you already have a running reverse proxy, head over to the next section.
- Use the scenario file
scenarios/add-nginx-proxy-manager.ymlfor deployment - Provide your FQDN for Zammad by using the environment variable
ZAMMAD_FQDN - Configure your DNS. The chosen Zammad FQDN should point to the IP address of the NPM host
- Configure a new proxy host in your NPM and follow the steps to get an SSL certificate
Add External Docker Network to Nginx
If you already have a reverse proxy which takes care about the SSL termination, this scenario is helpful. It adds an external Docker network to Zammad's included Nginx service to be able to access it from a reverse proxy that is not part of the Zammad stack's network.
- Use the scenario file
scenarios/add-external-network-to-nginx.ymlfor deployment - Provide the name of your external network by using the environment variable
ZAMMAD_NGINX_EXTERNAL_NETWORK
Using External Services
Disable Elasticsearch Service
Do you have an Elasticsearch instance already running and want to use it for Zammad, too? Then you can disable the Elasticsearch service in the Zammad stack to save resources.
- Use the scenario file
scenarios/disable-elasticsearch-service.ymlfor deployment - this will turn off the built-in service for Elasticsearch - Use the following environment variables to provide information about the connection to your existing Elasticsearch instance:
ELASTICSEARCH_SCHEMAELASTICSEARCH_HOSTELASTICSEARCH_PORTELASTICSEARCH_USERELASTICSEARCH_PASS
Making Services Externally Available
These scenarios are meant to connect from external applications to Zammad services. Depending on where your external service is hosted, you can use one of the following scenarios.
DANGER
When exposing Elasticsearch outside the stack, make sure to set the variable ELASTICSEARCH_PASS to a custom value first! Otherwise this is a big security issue because the Elasticsearch index contains most of Zammad's data.
TIP
If you want to use TLS, you have to connect to Elasticsearch via reverse proxy.
Add External Docker Network to Elasticsearch
A common use case for this is to use a reporting/visualization tool like Grafana on the same host in another stack. Because such tools need to access the Elasticsearch index, the network of the other stack has to be added to Zammad's Elasticsearch container.
- Use the scenario file
scenarios/add-external-network-to-elasticsearch.ymlfor deployment - Provide the name of your external network by using the environment variable
ZAMMAD_ELASTICSEARCH_EXTERNAL_NETWORK
Add Host Port to Elasticsearch
In case you want to expose the Elasticsearch service of the Zammad stack in the network, you can assign a host port to the container. This is useful if you need to access the Elasticsearch container from a different host.
- Use the scenario file
scenarios/add-hostport-to-elasticsearch.ymlfor deployment - The default port for Elasticsearch is
9200. Change it to another port by using the environment variableELASTICSEARCH_EXPOSE_HTTP_PORT
Additional Scenarios
Disable Backup Service
In case you want to handle backups in a different way, you can disable the built in backup service in the stack to save resources.
You can do so by just using the scenario file scenarios/disable-backup-service.yml for deployment.
Add Ollama
You can spin up an additional Ollama container to use Zammad's AI features on your machine.
INFO
This is intended for development or testing purposes as running a productive LLM stack is complex.
To deploy an Ollama container inside the Zammad stack, use the scenario file scenarios/add-ollama.yml. This creates an Ollama container which automatically pulls and serves Llama3.2 to be ready to use/test AI features out of the box.
To use it in Zammad, add the service name and port (http://ollama:11434) to the provider configuration.
Limit Resources
If you want to limit the hardware resources the Zammad stack is allowed to use, use the scenarios/apply-resource-limits.yml scenario. Default values for CPU and memory usage for each container in the stack are applied then. You can find these default values in the .env.dist file. Provide the changed variables you want to use as environment variables and deploy the stack.
Other Use Cases
Your scenario is not covered yet? Feel free to suggest your use case. We plan to add more common use cases to the stack in future.
Customize the Stack Locally
Sometimes it's necessary to apply local changes to the Zammad Docker stack, e.g. to include additional services. If you plan to do so, we recommend that you do not change the docker-compose.yml file, but instead create a local docker-compose.override.yml that includes all your modifications. Docker Compose will automatically load this file and merge its changes into your stack.