Start with Zammad
User Interface
General
The user interface (UI) of Zammad is designed to provide an intuitive experience for users. It is built around the concept of simplicity, clarity, and accessibility.
There are basic modular components for different features to keep the UI consistent. These components are described in the section Main UI Elements as well as Navigating below.
Depending on the currently opened screen, there are interactive components, such as tooltips and a contextual help. Use them wherever needed.
In any case, the UI is based on common software design principles and is mostly self explanatory.
Main UI Elements
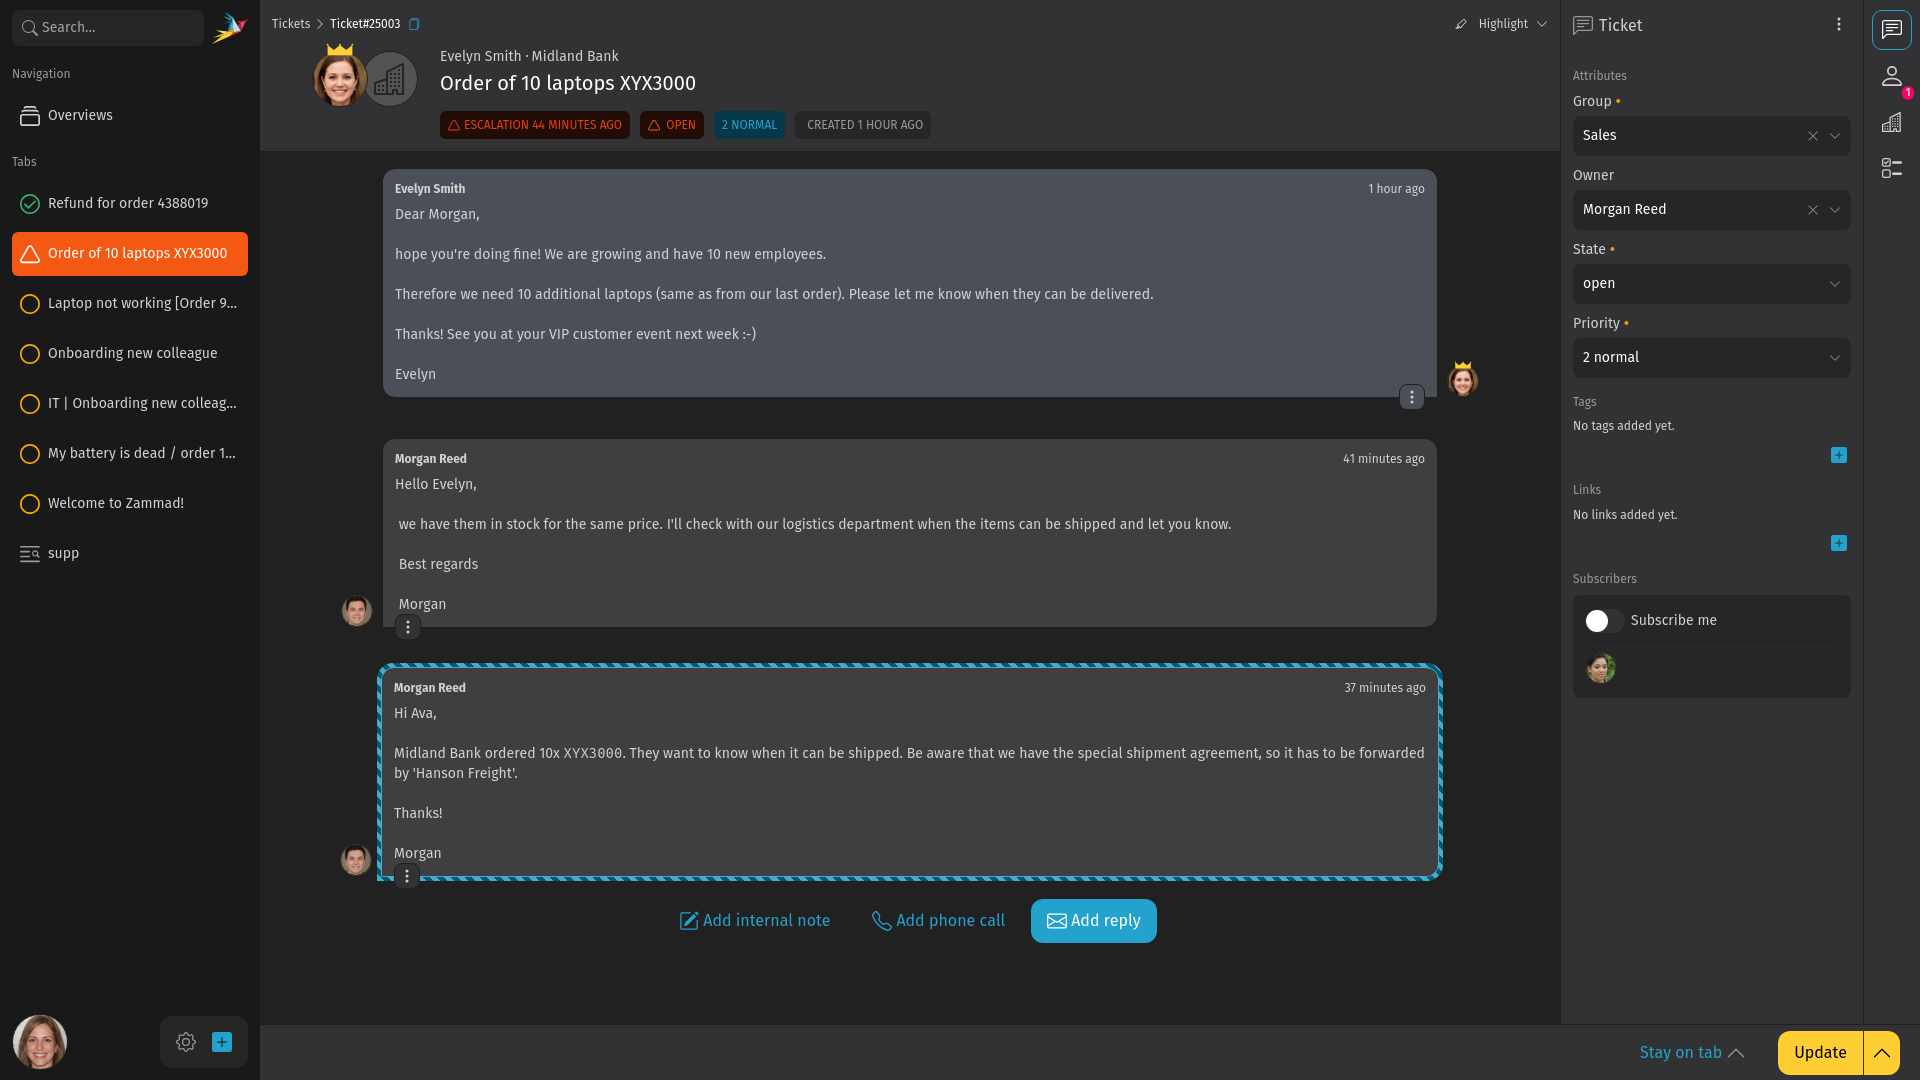
The screenshot above shows a ticket detail view in Zammad. Read on for a description of the different main elements of Zammad.
- Navigation sidebar
- This is the left sidebar which includes the search, notifications, overviews, ticket tabs, your avatar and the ticket create button.
- Navigation tab
- Each item of the navigation sidebar is called navigation tab. Depending on the content, it can be a ticket tab (with the ticket detail view) or the overview tab which opens the list of available overviews.
- Ticket detail view
- This is where you handle your customer requests. It is located in the middle of the screen if a ticket tab is selected in the navigation sidebar.
- Sidebar
- This is the right sidebar in the ticket detail view. It contains sidebar tabs like customers and checklists and displays the currently selected tab.
- Sidebar tabs
- On the right side of the sidebar, you can find small icons to switch between the different tabs. The availability of these tabs depends on your system configuration, your permissions and the ticket attributes (e.g. if the ticket customer has an assigned organization).
- Active sidebar
- The selected sidebar tab. Displays the content of the tab. It can show things like customer sidebar, organization sidebar, checklist sidebar and more.
Navigating
The navigation sidebar is your central place to access all main parts of Zammad. It includes:
- Search bar
- Notifications
- Overview section
- Chat (if activated)
- Phone (if activated)
- Ticket tabs
- Avatar with menu
- Settings (if you have permissions)
- Ticket create button
The main navigation in Zammad is done in this sidebar. It is always visible and you can switch between ticket, overviews and the search, for example.
Zammad immediately saves your current work progress, so you can easily switch between the different areas of Zammad and you don't have to be afraid of losing any data like a not yet sent answer in a ticket.
Finding Tickets
There are different ways to find tickets, depending on your use case.
Via Overviews
If you search for new tickets to work on, your first look should be in the overview section. You can either open it by clicking the Overviews button in the navigation bar or use the keyboard shortcut o. You can see overviews as a kind of ticket lists.
By default, there are some built in overviews, you can use. For example, there is an overview called "Open Tickets". This might be a good starting point. Your Zammad admin may have created additional overviews. These are based on conditions, which are basically rules, to define which ticket appears in which overview.
For a detailed description, head over to the overview usage guide.
Via Search
However, if you search for a specific ticket which might or might not be visible in the overviews, you can use the search. You can find it in the top left corner in the navigation bar. Either select it via mouse or use the keyboard shortcut by simply pressing s.
After activating the search field, you can find the tickets you recently closed from your taskbar as well as your last search queries.
By entering a search term, you immediately see a preview of the search results. If you press enter or click on detailed search, Zammad displays a page with search results. There you can differentiate by object type (e.g. customer), what you are searching.
Have a look at the search guide for more details.
Notifications
Depending on the notification settings in your profile, you receive updates for different ticket based events like the creation or the update of a ticket. This ensures that no important change to a ticket is overlooked.
You can open them by clicking on the notification counter in the top left corner. If there is a badge with a counter, the counter shows the number of unread notifications.
By default, you get notified when one of your tickets (means you are the owner) got updated. By clicking on the link in the notification, this ticket gets opened in the navigation sidebar as tab and the ticket detail view is displayed.
Ticket Basics
Introduction
If you're completely new to a ticket system and handled your customer requests with an email client so far, you might think that a ticket system is complicated. But the opposite is the case:
- All emails are now collected in Zammad (and requests from other channels might be as well).
- You and your colleagues can see who is working on which customer request ("ticket").
- The state of each request as well as the history (who did what?) is transparent.
- There is no duplicate work and nothing gets overlooked.
- You can ask your colleagues directly in the ticket for help in difficult cases.
- With Zammad's intuitive UI, you can focus on what matters: to resolve customer issues and answer customer questions.
So, basically you can work with Zammad similar as with your email client. Except that you have some additional attributes you can set in the Ticket sidebar tab:
- State: reflects the current state of a ticket (mainly if a customer request is resolved or not). By default, there are the following states:
- New: State for new tickets on which no one has worked on. When updating a ticket the first time, it automatically switches to open.
- Open: State for tickets which aren't resolved yet and some work needs to be done.
- Pending Close: State for tickets which are basically resolved but you don't want to close immediately. This state requires you to enter a date and time at which the ticket automatically switches to closed.
- Pending Reminder: State for open tickets which you want to get reminded to a certain date and time. Requires you to enter a date and time at which you want to get notified. For example useful if you had a question to a third party and want to make sure that this issue won't be forgotten.
- Owner: This is the person who is currently responsible for the ticket. In case you need information from another colleague, you can either change the owner to this person or mention the person in an article by typing @@ and selecting the user. In the latter case, the user gets notified and is automatically subscribed to receive notifications on ticket updates.
- Group: This ticket attribute is useful for organizations with more than one team. Depending on the permissions, you might not see the ticket after changing the group and saving the changes.
Ticket Detail View
Now that you are aware about some attributes, let's have a look at the ticket detail view.
The ticket detail view provides all relevant information of a ticket. As its main part, all articles of the ticket are shown here. The oldest article (which created the ticket) at the top, the newest at the bottom. Depending on the article type, Zammad offers you different ways to react. For text communication based articles, you can directly create an answer by using the reply button below the article or use the forward feature. The integrated text editor is intuitive and includes buttons in the toolbar to format your text and insert objects like tables or images. If you want to learn more about the editor, the editor guide includes additional information.
Regardless of the customer's article type, you can always add internal notes. These are useful to add information to the ticket or ask a colleague.
Updating your Ticket
After you have done your changes like writing an answer to a customer and change the state of the ticket, you can see a highlighted Update button in the right footer. By clicking it, your changes are applied and if you created an answer, it is now sent out to the customer. If you consider the issue as resolved, you should set the state to closed now.
Conclusion
This was a brief introduction about how to work with Zammad if you are completely new to ticket systems. Knowing the basics of Zammad now, you can either start working or have a look at the advanced features section to become even more productive and use the full potential of Zammad. The different sections in the navigation menu might also include interesting content. 🚀